Hi everyone,
Thank you for your comments about the idea of video blog posts! And anyone who hasn’t answered yet, be sure to join the conversation by commenting on this post or the previous one and letting me know what you think of video blog posts of crafts, recipes and updates on the magazine.

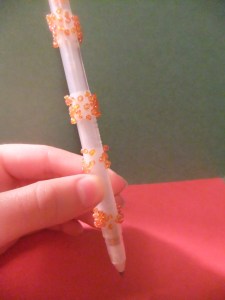
In the meantime, I made the craft from the Fall 2008 issue of YALDAH- Beaded Pens! My photos are on the left. I did it slightly differently than it’s described in the magazine (I did strips of beads rather than doing the whole pen and I used an orange gel pen that matched the beads instead of a plain pen). In concept, however, I used the instructions and I was thrilled with how it turned out! Here are the instructions to make your own:
Beaded Pens
By Aliza Laufer, age 11, from MA
Materials and Tools:
-Basic pen
– Double sided tape
– Seeds beads of any color (seed beads are tiny beads around the size of 1 millimeter thick and available at craft or bead stores).
– A plate or tray
– Marker
– Scissors
To make:
1. First, place the seed beads in a tray.
2. Leave the cap on the pen and with your marker, draw where the edge of the cap is along with the part of the cap that sticks up. Make sure not to put any beads on these areas.
3. Wrap double sided tape around the pen, one section at a time. For sections where the part of the cap sticks out, don’t wrap the tape all the way around.
4. Either roll your pen in the beads or sprinkle them lightly over the tray. Occasionally, firmly press the beads to be sure they stick to the pen.
5. Once you have completely covered the pen, give it a few more squeezes to really secure the beads and then, get down to writing!
If you try this craft out, take some pictures and e-mail them to me at emily@yaldahmagazine.com along with your name and I’ll post them on this blog!
What do you think of this post? Be sure to comment and let me know!
Talk to you soon,
Emily


came out really nice! id luv 2 c u making it in a video- it wud b so exciting!!
Very good Idea, Emily!!
yup
Great Idea. Can you not do it via YouTube, as m compputer will jnot allow it, if you do can you at least post the transcript. Thank You.
ya mine too doesnt allow it,do the beads fall off alot while u r writing? just wondering……………….